How To Setup Articles
If you want a tank like mine above (220g #1 - pic taken 2009), below is a list of items & equipment needed to setup my AquaCorals Reef System. It does not include the PVC pipe & parts needed to plumb. That is addressed under my articles "How To Plumb". Again, if you do what I do, using the same equipment & supplies I do, you will duplicate my success!!
----------------------------------------------------------------------------------------------
Tank & Stand - I highly recommend a 75g MIN! 220g+ BEST!! See my article "Tank Selection" for details!
Overflow Box Sets: I use the following:
75g to 90g - Use 2 PF 800
110g to 125g - Use 3 PF 800
150g to 220g - Use 3 PF 1000
265g to 300g - Use 4 PF 1000
NOTE on the PF 1000 overflow box sets - Do NOT use the 2 U tubes included. Purchase a single 1.5" U tube & use only 1 per overflow box set. Why? Because the U tubes are not anchored but rather just sit on the top of the box set & one U tube is always a tad deeper into the skimmer box than the other which means it take in more water than the other & the slower U tube can eventually collect air & potentially break it's siphon over time. Trust me, use a single 1.5" U tube which I use here & works marvelously.
Sump Water Pump (Submersed or in-line): MUST provide a MIN 10x per hr turnover - MINIMUM. Example: 75 gal tank x 10 = 750 GPH at the top tank rim! I'd use a 950 GPH & valve the flow back (or slow it if a DC pump) if needed.
Skimmer: Choose one that more than satisfies your min system gallons (include sump) example: 75g + 25g sump = 100 gal system. Choose a 150 Gal rated or higher. You CANNOT over skim - ever!
Titanium Heaters: Size - Min 3 watts per gallon (be sure to include approx sump gallons & round up the total gallons) - more watts is better as the heaters don't have to run as long. We use at least 2 heaters for redundancy in case one fails.
Why not glass heaters? Thermometers are the most prone to failure of ALL the power equipment we use & the glass ones are more prone to glass breakage as well as the thermostats sticking on the ON position = cooking a tank! Titanium element heaters are much stronger & less prone to failure. Finnex makes a good line of durable heaters.
Thermometer: Use a glass floating thermometer alone or to back up & dial in digital equipment. NEVER EVER rely on digital displays to be accurate. An inexpensive glass floating thermometer is your safest & most accurate measure of this critical tank parameter.
Powerheads: (2) are always used on the tank ends blowing to the front glass - (1) for Left end) & (1) for Right end). The others are for the tank back glass center to front glass:
3 Ft Tanks use (3) total MJ Pro 600 - (1) for back glass
4 Ft Tanks use (4) total MJ Pro 900 - (2) used for back center to front
6 Ft Tanks (up to 18 inches front to back wide) use (2) MJ Pro 1200 (L & R ends) & (2) use MJ Pro 900 for back center to front
6 Ft Tanks (over 18 inches front to back wide) use (4) MJ Pro 1200 - (2) used for back center to front
Initial powerhead Placements:
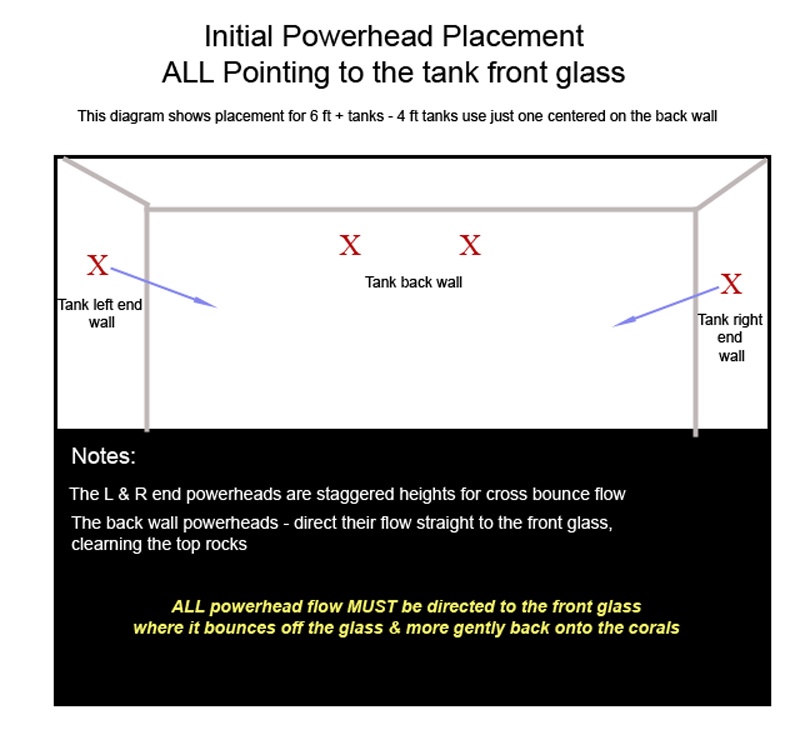
Wavemaker: Either a stand alone which our powerheads would be plugged into or DC self waving powerheads the need here is to create random water flow inside tank to simulate the ebb & flow of ocean current. We DO NOT want to create a circular flow like a whirlpool in our tank! We want the flow from each powerhead to either bounce off the flow of another powerhead &/or the front glass back onto the corals. It's the corals that need flow coming into them to not only stimulate the polyps to open but to also remove debris from them & bring natural foods to them. In my system, the powerheads DO NOT factor into the system turnover rate. Only the main sump pump does.
RO (Reverse Osmosis) Water Filter: MUST have - strips impurities/contaminants out of our water source.
RO Float Valve: To expand RO Automation, i.e. auto top-off/evaporation replacement in the sump & to refill freshwater & saltwater mix containers for full automation.
Salt: IO Reef Crystals - Reef Salt is what II use at AquaCorals
Refractometer: Measures the amount of salt in your water I do NOT recommend Hydrometers as they rarely, if EVER give a correct reading! This is too important to risk! Get a Refractometer & protect your livestock investment!
Reef Lighting: LED, T5, Metal Halide, VHO Flo - All good & very critical to keeping corals!
Ground Probe: Removes stray electrical current protecting you & your livestock!
Sump Tote: Largest to fit under stand!
Live Rock: 1 Lb per gallon of tank MINIMUM. Do NOT go as much as 2 Lbs per gallon or you'll end up with water displacement = more rock than water in your tank!
Sand: Bottom: Carib Sea Oolite Ocean Direct Live (live/wet) Reef Sand 40 Lb Bags - 3 - 4 inches
Sand: TOP: Carib Sea AragAlive (live/wet) – 1 - 2"
How Much Sand To Use:
Tanks with a floor dimension of:
48" x 18":
Bottom Sand = 4 Bags of 40 Lb Oolite Ocean Direct Live Reef Sand
Top Sand = 3 20Lb bags of AragAlive "Special Grade"
48" x 24":
Bottom Sand = 5 Bags of 40 Lb Oolite Ocean Direct Live Reef Sand
Top Sand = 4 20Lb bags of AragAlive "Special Grade"
72" x 18":
Bottom Sand = 6 Bags of 40 Lb Oolite Ocean Direct Live Reef Sand
Top Sand = 5 20Lb bags of AragAlive "Special Grade"
72" x 24":
Bottom Sand = 7 Bags of 40 Lb Oolite Ocean Direct Live Reef Sand
Top Sand = 6 20Lb bags of AragAlive "Special Grade"
----------------------------------------------------------------------------------------------
You will also need:
Tank Glass Scraper
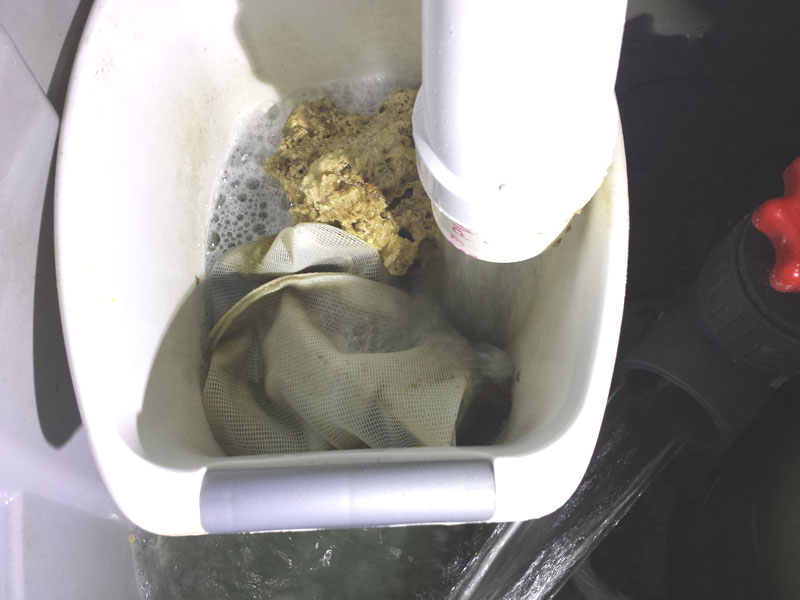
Reef Carbon & Polyfilters - to help remove organic & chemical contaminants
Mesh Bag - to hold your carbon media
Additional powerhead to stir your new saltwater container - I recommend the MJ600 or MJ900
Hose to perform water changes - - I recommend the Python Hose but do not use any attachments - just the hose only
There are 2 styles of pumps we can use to run our reef system:
1. Submersible reef pump - this pump sits inside the sump under water. It is commonly used when there is little or not enough room for a pump to be installed externally under a stand etc.
2. In-line external reef pump - this pump sits outside & next to the sump & is connected to the sump by means of a bulkhead installed in the side of the sump. There are other ways to connect these pumps to a system but for the simplest application & for my system we will focus on this method of connection.
The Sump - There are 3 primary functions to a sump. To collect water from the main tank & condition it by 1. Heating the water 2. Skimming the water of dissolved organic material & 3. Oxygenating it from the "dumping action". A sump can be made by using another fish tank, tote or specifically purchased sump. The sump "size" has nothing really to do with how many gallons of water it can hold but rather how much "space" it gives us to hold all the equipment we need IN it and space enough to hold any water that back feeds down to the sump when the pump is powered off or if we loose power. My best advice is to purchase the largest sump container you can fit under your stand!! More room to work with is always better! :c)
Warning! Most commercial sumps are partitioned & restrict what size equipment we can place in them. Many manufacturers state their sumps are suitable for a certain size tank/system but most often they are NOT as they are not designed to handle the minimum 10x per hour turnover rate we need & many times are too small to fit the equipment we need in it! This includes most so-called "Reef Ready" pre-drilled tanks!
I recommend using a good quality tote (this is what I use!) - find a sturdy (like Rubbermaid) tote with a flat bottom (no wheels!) - the biggest your stand will allow & for most, no taller than 16 inches in order to more easily remove your skimmer collection cup. The best tote design is one around 14-16 inches tall, is completely flat on the bottom inside and is super strong & doesn't bow out when full of water. If you need a smaller tote than this, most Home Depot, Walmart & Target stores have good quality totes. Colored totes tend to be stronger than the clear ones.
The Pump (in-line or submersible) pumps the water back up - returns it into your tank. The dumping of water from the overflow into the sump naturally creates a ton of bubble = aeration, basically super saturating the water with oxygen. This type of system can handle a power outage many hours longer than mechanically filtered tanks. The sump houses your heater & skimmer, decreasing the amount of equipment in your main tank. Saltwater tanks which do not utilize an overflow system will have a “film” on the tank’s water surface (which not only looks nasty but also blocks light from entering the tank & deters nitrogen gas/air exchange). My overflow system skims the water’s surface, removing any film material & gets it down to the skimmer where it's removed.
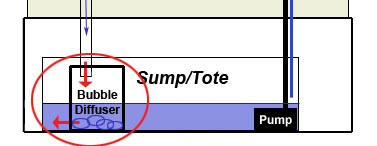
The Bubble Diffuser is where the water dumps into the sump. Usually made of a simple bathroom trash can or 5g salt pail (minus the metal handle) or any clean plastic/PVC container that we can make an hole in. The dumping of the water down to the sump creates a ton of micro bubbles which if sucked up by the pump will fill our tanks with these bubbles which irritate the fish & corals and can even kill corals if left to accumulate on the coral flesh. Given this, we need to diffuse the dump flow.
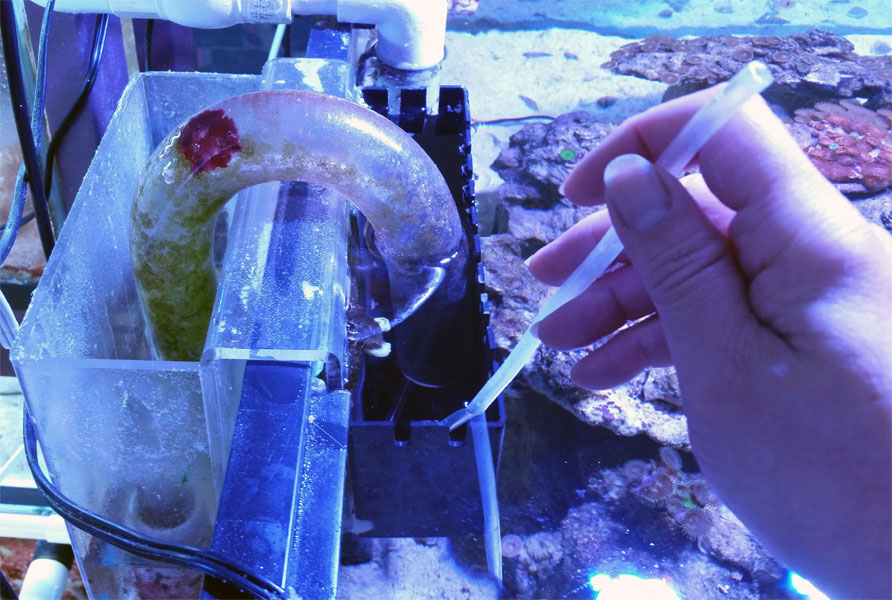
Below is one version running on a 220g/75g tag on here at AquaCorals. It's a simply a Rubbermaid bathroom trash can (new & cleaned with white distilled vinegar, hot water & paper towels). I cut a hole on the left side bottom about 6 inches wide by 2 inches tall. I made the hole about an inch up from the bottom. Leaving this lip keeps the rocks I used inside the diffuser from slipping out the hole. A couple pieces of live rock not only help keep the diffuser in place but also helps break the bubbles. This is also a great place to run a bag of ROX carbon & Polyfilter pads when needed. I used a salt pail lid to cover the diffuser to stop any splashing & eliminate any salt creep. Note that the 2 inch dump pipe is above the water level. This is very important as we don't want to restrict the dump in any way. Always dump above the sump water level.
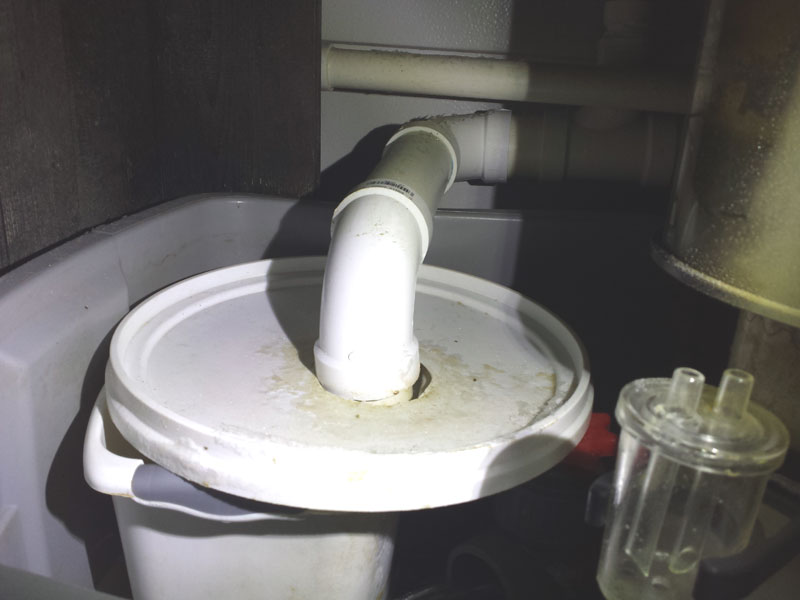
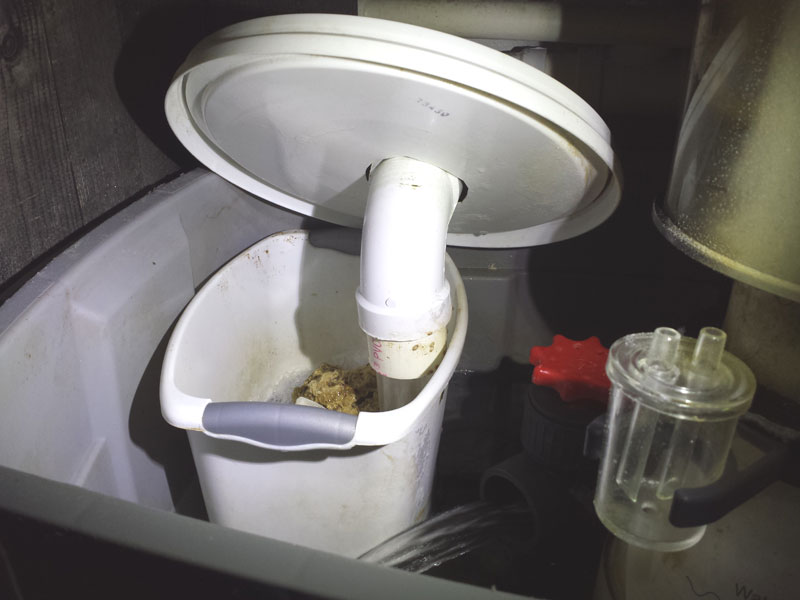
Notice the skimmer outflow is directed towards the outflow of the bubble diffuser and away from the sump pump (which is not seen here but is to the right of the skimmer). Directing the skimmer's outflow towards the diffuser's outflow helps push back any bubble & makes most of them them rise & break in this area. Again, so they don't reach the sump pump & get thrown into our tank.
Still working on this article. Check back for more!
Water Movement & Water Conditioning - The "Overflow" System:
My Overflow system is simply ... water dumps down to the sump & is pumped back up (returned) to the tank.
My overflow system consists of 3 main parts:
1. Overflow Box Set(s) - Overflows "Dump" / gravity feeds water out of the tank & dumps it down to your sump.
2. Sump - any container (I recommend a tote) which collects the water dumped from the overflow - normally placed under your tank in the stand but can also be placed more remote like in a basement under the tank or in a room/closet next to the tank.
3. Main/Sump Pump & "Return" Plumbing - a pump that takes water out of the sump & "returns" it to the tank. Submersible or in-line pumps. These can be used under your cabinet and remotely, i.e. in a basement etc. as well! :c). PVC pipe connects to the pump and goes up to & over the top rim & into your tank. This pump line is called the "return" as it's returning the water back to your tank.
The below diagram simply shows how we're just dumping water out of the tank, down to the sump & the pump just "Returns" the water to the tank. 4 ft tanks will have at least 2 overflow boxes with larger tanks having more (see Equipment Needed for different size tanks). Again, this is just to show how simple the water movement is in this system.

How The Overflow System Works:
The Overflows – I use & recommend EShopps hang-on overflows. See my article "Items Needed" for details.
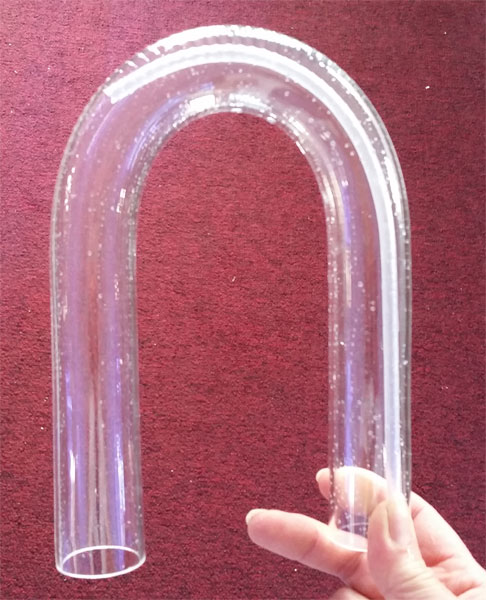
An “overflow box” set sits on the back rim of your tank. It consists of 3 parts: 1. a Skimmer box (smaller black box that has slots) which hangs on the inside your tank. This skimmer box is connected to a larger 2. Back box by means of nylon wing nuts. Most overflow skimmer boxes can be raised or lowered on the main box & it's height will determine the height (water level) in your tank. If using more than one overflow box set, all skimmer boxes should be set at the same height. If one is lower in your tank the lower one will take in water first & run faster (out of balance with the other overflows). When your main sump pump is running - pushing water into your tank, the water in your tank flows through these "teeth" on the skimmer box, dumps down into the skimmer box & is "siphoned out" by means of gravity with the use of a “U” tube which dumps the water to the Back box where the water then flows down through a ribbed hose or PVC pipe to your sump.
Understand that these overflow sets only run as fast as the main sump pump is pushing water into the tank.
A good/quiet operating level is for the tank water to drop inside the skimmer box about 1-2 inches below the bottom of the skimmer box "teeth/slots". If your overflow is filling too high inside the skimmer box = running too fast & is noisy just close the pump valve a tiny bit (slowing the flow of water into the tank) & wait a minute to see how much of an adjustment this makes on your overflow(s). The overflow pictured below is just a "clear" example so you can see how it works. NOTE: Pictured here is a different/discontinued style overflow than the EShopps brand I use but they work the same. The wing nuts shown here facing the backside will be on the inside of the skimmer box for your setup and the back box will have a black bulkhead with a loose white PVC breather pipe.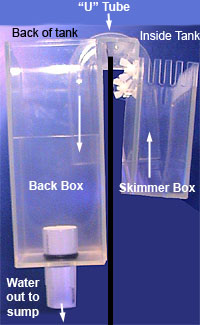
Each overflow box set has a different flow rate/GPH (Gallons Per Hour) meaning the maximum number of gallons of water that can flow through it in one hour. Use as many overflow box sets that will put all your tank gallons through your sump & back to the tank a minimum of 10 times per hour. This is called a "Turnover Rate".
Example: 75 gallon tank x 10 = 750 gallons per hour.
Beware! Some overflow models use 2 U tubes on one box which I don't recommend nor will I sell them. Reason being is that the U tubes never perfectly sit at the same level so one is always going to intake water more than the other. Eventually one will intake air bubbles & could loose it's siphon with disastrous results!
How To Setup & Start Your Overflow Box Sets:
You will need a piece of airline tubing (about a 2 foot piece for each overflow) that you will use to start the water flowing through the sets.
1. Set the overflow box set(s) on the tank rim & position the skimmer boxes (small boxes with teeth) at the same level inside the tank (assuming you are using more than one set). Adjust them if they have a wing nut adjustment slot. If the sets are not at the same level, the lower one will catch water first & run harder (noisier) while the other(s) will run slower & risk gathering air bubbles in the U tube.
2. Fill your tank full of water so that the water level has filled the skimmer box to the base of the teeth. Next, fill the back side if the overflow with water where the U tube sits. This makes the U tube ends sit under water both in the front & rear. Next have your sump filled with water about 4 inches over the top of your pump. If using an in-line pump the sump should be filled about 2 inches deeper than you want it to operate at. This is to allow for your plumbing pipes to fill with water upon starting the pump which will draw down the sump level a bit. For submersible pumps you want your running water level to be 1 - 2 inches over the top of the pump.
3. Make sure all your vertical return valves are wide open to start the system.
4. When the water is at the right level in both the tank & sump:
a. Take the U tube, slide the airline in so it just crowns the top of the U tube to the other side. Holding the airline in place in the U tube, set the U tube in place in the overflow box set. Have the longer side of the airline hanging out of the skimmer box. Do this to any other units then...
b. Start the water siphon in the U tube. Time Critical! You might want 2 people with one ready to turn off the pump while the other starts the U tube siphons. Remember! Once your pump is turned on water is pumping into your tank it has no way out except on the floor until you get the overflow(s) running & dumping water out to your sump. Turn on your water pump then take the outside portion of the airline & suck out the air in the U tube while pulling out the airline until water flows freely through the tube. This starts the water siphon. I'm Right handed so I use my left hand to hold the U tube in place while using my Right hand to hold & draw out the airline. This may take more than one try so be positioned/prepared to turn off the pump for a second try. Once flowing, if there are any air bubbles in the U tube gently tap them out by lifting & tapping the U tube up & down on the tank rim (do not bring the U tube all the way out of the water though or you'll loose your siphon & have to start it again!)
Once your box set(s) are running you will want to check the water level dropping inside the skimmer (toothed) boxes. The running water level inside the skimmer box(s) should be about 1 - 2 inches below the teeth. Any higher & they are running too hard & will be noisy. Any lower & they are running too slow & will allow air bubbles to catch up at the top of the U tubes, eventually making a bubble large enough to break the siphon. To adjust the water level in the skimmer box(s), open or close the ball valve on your pump.
Here's a mini video where I explain this:
To increase or decrease the water level inside the skimmer box we make slight hair turns on the main ball valve off the pump. After each adjustment WAIT a couple minutes as it takes the system time to catch up & adjust to the new flow rate. Adjust again if needed to achieve the 1/2 to 1 inch water level below the teeth inside the skimmer box.
WARNING! Once you start the system. if you turn off your pump the vertical returns will back feed tank water to your sump! The only way you can stop the water back is to shut off the main ball valve completely or your vertical returns will siphon your tank & overflow your sump! Get your overflows running then shut down the system, immediately turn off the main pump valve & drill those siphon holes in all of your returns so the next time you power off your system, the siphon holes sucking air will break the back feed & you won't have to touch your pump valve again.
Live Rock: Use 1 lb rock for every tank gallon.
Rock along with your sand IS literally your biological "filter" so it's important to have enough of both to do the job we need it to do.
Used in conjunction with the deep sand bed, live rock is the “other half” of Mother Nature’s “natural” biological filtration. Beneficial bacteria lives on & within the rock just like it does on the filter cartridges of your mechanical (let’s say back hanging) power filters, thus eliminating the need for such power filters. Make sure to build your rock structure with a fist size space between your glass & rocks all the way around the tank to allow for good water flow around your rocks. It also creates great swim through places for your fish!
Some people think if 1 lb per gallon is good, then 2 lbs per gallon would be twice as good - right?! NO. At 2 lbs/gal you have very little water left due to the displacement from the rocks. There's a healthy balance & 1 lb/gal is it. Understand more rock weight will be added as you purchase corals, especially if they are AquaCorals corals as mine are all mounted to real rock.
There are many different rock sources but they're not all the same. The vast majority of rock available today is dry mined on land where ancient sea beds once were. Some companies mine too shallow so their rock harbors heavy metals & other contaminants (even though they say they're washed etc!) which will have a negative effect on your tank as these contaminants leech into your water. I recommend using Marco Rock.
Stay away from fake colored rocks! The coloring can also be a contaminant! Be patient. Your rocks will color up naturally on their own.
Rock shapes - some are better suited for building the base reef structure like bigger bulky pieces counter sunk a couple inches into the sand bed ... to ensure your reef is stable & not always falling! Build up with different rock shapes for aesthetics but more importantly for shelving space to place the eventual corals you'll want to have.
Don't worry about creating fish swim through areas. You will find they easily find all the spaces between your rock structure. Again, leaving a fist size space around all your rocks not only is critical for water flow but also creates fish swim space too!
I do not recommend gluing or pinning the rocks together. Anyone in this hobby for more than a year will easily tell you that nothing stays the same! At some point you will want to move a rock here & there to accommodate a coral etc. so don't make anything permanent. Just play with your rocks until they feel stable/naturally lock into place.
Lastly, try not to be too picky about how pretty your rock structure "looks" because soon the corals you place on them will either cover or become the dominant view - & rightly so!
Filtration = DSB/LR/O (Deep Sand Bed / Live Rock / Overflow system):
Deep Sand Bed & Live Rock... This IS your "filter". (No mechanical/power filters or bio balls needed!) Any "filter" is a place where good bacteria lives that breaks down all the wastes. In mechanical/power driven filters the bacteria is provided "housing' on filter pads, "bio wheels", "bio balls" & other "medias". In a natural system (which simulates what Mother Nature does in our oceans) the vast majority of bacteria resides in & on the surface area of our live rock & sand.
I cannot stress enough how important this section is! To be successful with my "reef system recipe" you absolutely CANNOT skimp on the amount of live rock & depth of sand bed installed. These 2 areas do 99% of your system's filtration. Again, filtration is the breakdown of all wastes produced in the total system. Uneaten foods, fish excrement etc. It is critically important to have enough of both areas to harbor enough good bacteria to fully breakdown all wastes, producing a complete Nitrogen Cycle. There are 4 basic "good" bacteria, 3 of which need oxygen to live & the 4th likes low to no oxygen areas. The inner depths of your rock & lower levels of your sand will provide this anoxic area for this last, but VERY necessary bacteria...which breaks down NitrAtes.
1. Deep Sand Bed 4 – 6+ inches deep.
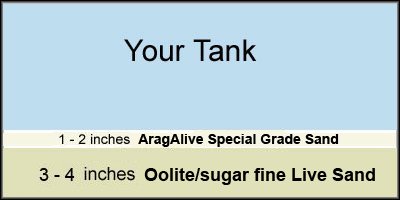
I recommend using a combination of 2 different grain sized substrates: First use 3 - 4 inches of “CaribSea Ocean Direct Live Oolite" a fine sand used on the bottom. I use this finer sand because it compact tighter than larger grained sands which takes fewer inches to create a low to no oxygen region. Because it's very light it tends to blow around & irritate corals so we top the fine sand with 1 - 2 inches "Carib Sea “AragAlive Special Grade". This sand is a little heavier being a larger grained sand which will hold down the lighter fine sand base but it still fine enough for all sand loving critters to utilize including Gobies, Cucumbers etc. Note: It is important to install the deep sand bed in the tank itself because this is where uneaten fish food & fish waste end up. Very little of that matter gets up to & through your overflow to a sump. Your tank sand bed is the workhorse of the entire system! I do NOT recommend doing a sand bed in the sump - ever.
Using these live sand products will speed up the bacteria growing/cycling process. Nothing else is needed to cycle a tank. NO Damsels nor need to put food in the tank. Just let her rip for about 4 weeks.
How Much Sand To Use:
Tanks with a floor dimension of:
48" x 18":
Bottom Sand = 4 Bags of 40 Lb Live Oolite/sugar fine
Top Sand = 3 20Lb bags of AragAlive Special Grade
48" x 24":
Bottom Sand = 5 Bags of 40 Lb Live Oolite/sugar fine
Top Sand = 4 20Lb bags of AragAlive Special Grade
72" x 18":
Bottom Sand = 6 Bags of 40 Lb Live Oolite/sugar fine
Top Sand = 5 20Lb bags of AragAlive Special Grade
72" x 24":
Bottom Sand = 7 Bags of 40 Lb Live Oolite/sugar fine
Top Sand = 6 20Lb bags of AragAlive Special Grade
If you choose dry (not live) sand you will need to rinse it to remove dust particles before placing in your tank or you'll end up with a milkshake in your tank. I like to fill a 5 gallon pail 1/2 way with sand then overfill the bucket with water. As the water is overflowing the pail I stir the sand. This allows only the dust particles to float away with the water. Rinse only until the water looks like watered down milk.
Do not rinse any live sand product & Do not add your live sand until your tank is up & running with the proper salinity & temperature to keep the bacteria alive.
Choosing the LIVE sands mentioned above is a heck of alot less work & will cycle a tank all by itself with NO additional help necessary.
Steps to Setup your AquaCorals Reef System
1. Place your tank in the spot you want it. Tanks over 90 gallons should be placed so it sits across multiple floor stringers for better support. Exterior or supported interior walls are an even better placement choice! Make sure it sits level!
2. Add your dry substrate: For those of you wishing to "jump start" your bio system with live sand, add your dry sand now & wait until step 5 to add the live. It is highly recommended that you rinse your dry sand before adding to the tank. Using a 5g pail or other container, fill 1/2 way with sand then fill with fresh water & let the water overflow the container. Stir the sand while the water is running. This allows the "dust" material to overflow with the water while the heavier sand stays on the bottom. Rinse until the water looks like watered down milk. Do not wait until the water to runs clear! Would take forever! ;) Pour off as much water as you can then dump the sand into the tank. Add your fine sand first (Aragamax) then heavier sand on top (Sea Flor).
3. Setup your overflow system - Overflow box sets to dump to your sump
Plumb Your Pump System - PVC from your pump into your tank
Pump Plumbing Parts Diagram
How To Drill A Siphon Break Hole - Coming Soon!
4. Add your water & salt (to mix a “specific gravity” of 1.026 - understanding that most salts elements are formulated to this salinity), install power heads & heater set to 78 degrees (in sump - don't turn it on until you have water in the sump & are ready to start the system!) . The power heads should consist of one back wall to front & 2 more on both tank ends for 4 ft tanks & 2 on the back tank wall for 6 ft tanks, flows facing front 1/3 in to the tank front center. Prime your overflow set, turn on your main pump & start your system. Let your system water mix for at least 24 hours then…
5. Add your Live Sand & Rock. For those of you wishing to "jump start" your bio system with live sand, this is the time to add it. Do Not rinse your live sand! Once all sand is installed you can then begin placement of your live rock. Make sure your rock structure is solid (won’t fall down) with an open channel behind and spaces between the rocks for good water circulation. "Screw" or "twist" down the first base rocks into the sand to secure then build up. Again, leave a 1 - 2 inch space behind the rocks and leave yourself room to be able to scrape the glass where you want to view. Be sure to run your skimmer!
6. Patience! Allow at least 4 weeks for the tank to “cycle”. Caution! This is where many hobbyists get impatient & get into trouble! There is no "quick fix" to the cycle. It takes time for "all good bacteria types" to grow in enough numbers to break down all wastes in the system. Failure to be patient at this time will inevitably result in livestock death & money flushed down the drain!
7. Add “Clean Up Crew”. Cucumbers & Nassarius snails (clean sand) Astrea or Turbo snails (eat algae) Sm. Brittle Starfish (eat fish waste and uneaten fish food. Adding Hermit Crabs of any kind is not recommended. Even Scarlet Reef Hermits will make a meal of Astrea snails. Hermits will irritate the snail’s foot until it let’s go of what it’s attached to then the hermit will pick at the snails until the snail is devoured. Again, there are other critters without "bad behaviors" to use for clean up. See "Inverts & Clean Up Crew" for how many I recommend to add to a tank of each & more detailed information about each.
Please! Do not cycle your tank with a fish (Damsels, Mollies or otherwise). The Ammonia & NitrItes created by the cycle will kill or at the very least, torture these fish!! Again, please Do Not Use Fish to Cycle Your Tank! The live sand will be enough to cycle a new tank. Though pretty, Damsels are super territorial & will chase & pick on any new fish added after. For any newly Introduced fish, being harassed by a Damsel is extremely stressful and many times results in death of the newcomer. I DO NOT SELL DAMSELS nor do I advise anyone to buy them for this reason. Select your fish carefully. Will they eat corals? Will they get along with the other fish you have or may like to add in the future? Will they eat inverts (shrimp, feather dusters etc.)?
I highly recommend beginners to read my short message "Tips For Beginners". Please, research &/or ask before you buy! E-mail with me any questions. I want you to be successful & am more than happy to help you!
1. Water changes – 10% weekly! Don't be fooled by those who would tell you their tanks are thriving with less-than water changes! Water changes physically removes unwanted wastes & contaminants & replaces calcium & trace elements your fish & corals deplete during the week. Water changes, using a high quality salt like Tropic Marin Pro Reef, eliminates the need for additives like Iodine, Calcium, Iron etc.
a. Do Not mix fresh salt & water & dump directly into your tank! Freshly mixed saltwater needs to agitate/stir at least 24 hours (one week is best!) before being added to a tank. Just add a power head to your water container. Though you can’t see them with the naked eye, some salt crystals take up to 24 hours to completely dissolve. Also, fresh salt releases gases which need to escape from the water. These gases can be toxic to your all your livestock.
b. I recommend using Instant Ocean Reef Crystals salt (used exclusively at AquaCorals). It has everything needed to maintain a healthy reef system for ALL corals whether soft, LPS or SPS corals. My parent tank pics are proof of this.
Below is one of my water change rack systems. This was built for my house 180g system. This is obviously more capacity than I need for my weekly water change but I've learned through the years it's better if at all possible to give yourself more fresh & saltwater than you need because there will be times when you need to do more than the weekly when battling cyano, algae & you'll want more ready water on hand. Let's not mention the possibility of a mishap where again, you'd need additional water. The top 2 totes are RO filtered freshwater which automatically fill using a simple manual float valve (non-electrical). The floats work just like your toilet water tank float does. They shut off when the water pushed up against the float. Both freshwater tubs are used to refill my saltwater tubs & in some cases, a 1/4" RO tubing bulkhead can be installed at the lower part of a tub & used to feed the evaporation float in the sump. The lower 2 totes are saltwater mixing with a small powerhead pump in each as we can't let salted water just sit. It needs to be stirring constantly. Once I empty a saltwater tote I immediately refill it with a freshwater tote from above, add my needed salt & walk away.
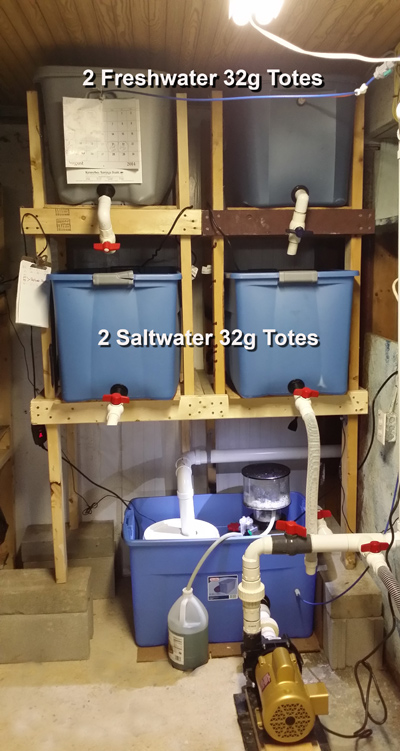
Do not worry if you don't have the room etc. to do an elaborate water change system as this one! Any clean container that will hold your 10% needs plus a little more to keep your stirring powerhead always submersed is enough! For years I only had a single container with a float valve that refilled my saltwater tote. I've got alot more to share with you, ideas & pics so be sure to check back as this article is not nearly finished BUT gives you an idea what to shoot for. :c)
I will be writing an article here about different lighting options which today are primarily LED systems. Spending more $ doesn't necessarily mean better. More on that here soon!
Subcategories
Your Cart
Login Form
Visitor Hours:
Walk-Ins
Saturday's
Noon to 3pm
See "What's New"
below for more info.
Newsletter
Reviews
-
A vendor who cares!
I just received my first order from AquaCorals. I have never been so impressed. The ...
Steven Reavis · Reviews · 1 months ago
