
Overflows
Water Movement & Water Conditioning - The "Overflow" System:
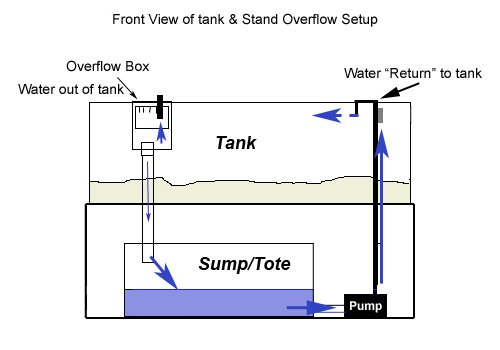
My Overflow system is simply ... water dumps down to the sump & is pumped back up (returned) to the tank.
My overflow system consists of 3 main parts:
1. Overflow Box Set(s) - Overflows "Dump" / gravity feeds water out of the tank & dumps it down to your sump.
2. Sump - any container (I recommend a tote) which collects the water dumped from the overflow - normally placed under your tank in the stand but can also be placed more remote like in a basement under the tank or in a room/closet next to the tank.
3. Main/Sump Pump & "Return" Plumbing - a pump that takes water out of the sump & "returns" it to the tank. Submersible or in-line pumps. These can be used under your cabinet and remotely, i.e. in a basement etc. as well! :c). PVC pipe connects to the pump and goes up to & over the top rim & into your tank. This pump line is called the "return" as it's returning the water back to your tank.
The below diagram simply shows how we're just dumping water out of the tank, down to the sump & the pump just "Returns" the water to the tank. 4 ft tanks will have at least 2 overflow boxes with larger tanks having more (see Equipment Needed for different size tanks). Again, this is just to show how simple the water movement is in this system.
How The Overflow System Works:
The Overflows – I use & recommend EShopps hang-on overflows. See my article "Items Needed" for details.
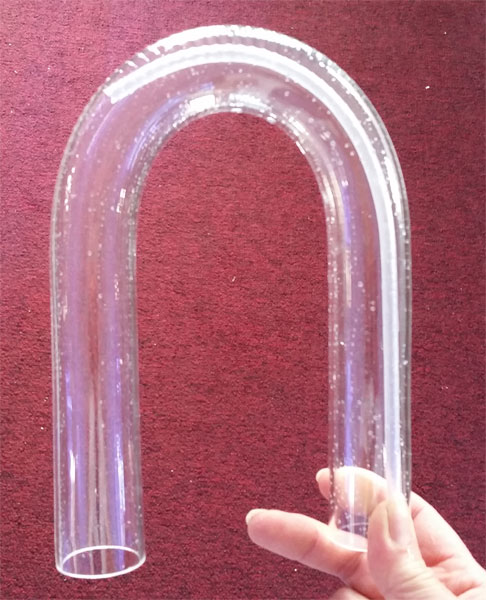
An “overflow box” set sits on the back rim of your tank. It consists of 3 parts: 1. a Skimmer box (smaller black box that has slots) which hangs on the inside your tank. This skimmer box is connected to a larger 2. Back box by means of nylon wing nuts. Most overflow skimmer boxes can be raised or lowered on the main box & it's height will determine the height (water level) in your tank. If using more than one overflow box set, all skimmer boxes should be set at the same height. If one is lower in your tank the lower one will take in water first & run faster (out of balance with the other overflows). When your main sump pump is running - pushing water into your tank, the water in your tank flows through these "teeth" on the skimmer box, dumps down into the skimmer box & is "siphoned out" by means of gravity with the use of a “U” tube which dumps the water to the Back box where the water then flows down through a ribbed hose or PVC pipe to your sump.
Understand that these overflow sets only run as fast as the main sump pump is pushing water into the tank.
A good/quiet operating level is for the tank water to drop inside the skimmer box about 1-2 inches below the bottom of the skimmer box "teeth/slots". If your overflow is filling too high inside the skimmer box = running too fast & is noisy just close the pump valve a tiny bit (slowing the flow of water into the tank) & wait a minute to see how much of an adjustment this makes on your overflow(s). The overflow pictured below is just a "clear" example so you can see how it works. NOTE: Pictured here is a different/discontinued style overflow than the EShopps brand I use but they work the same. The wing nuts shown here facing the backside will be on the inside of the skimmer box for your setup and the back box will have a black bulkhead with a loose white PVC breather pipe.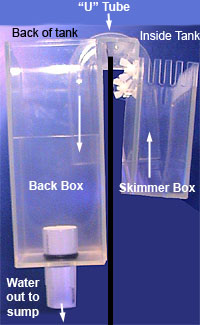
Each overflow box set has a different flow rate/GPH (Gallons Per Hour) meaning the maximum number of gallons of water that can flow through it in one hour. Use as many overflow box sets that will put all your tank gallons through your sump & back to the tank a minimum of 10 times per hour. This is called a "Turnover Rate".
Example: 75 gallon tank x 10 = 750 gallons per hour.
Beware! Some overflow models use 2 U tubes on one box which I don't recommend nor will I sell them. Reason being is that the U tubes never perfectly sit at the same level so one is always going to intake water more than the other. Eventually one will intake air bubbles & could loose it's siphon with disastrous results!
How To Setup & Start Your Overflow Box Sets:
You will need a piece of airline tubing (about a 2 foot piece for each overflow) that you will use to start the water flowing through the sets.
1. Set the overflow box set(s) on the tank rim & position the skimmer boxes (small boxes with teeth) at the same level inside the tank (assuming you are using more than one set). Adjust them if they have a wing nut adjustment slot. If the sets are not at the same level, the lower one will catch water first & run harder (noisier) while the other(s) will run slower & risk gathering air bubbles in the U tube.
2. Fill your tank full of water so that the water level has filled the skimmer box to the base of the teeth. Next, fill the back side if the overflow with water where the U tube sits. This makes the U tube ends sit under water both in the front & rear. Next have your sump filled with water about 4 inches over the top of your pump. If using an in-line pump the sump should be filled about 2 inches deeper than you want it to operate at. This is to allow for your plumbing pipes to fill with water upon starting the pump which will draw down the sump level a bit. For submersible pumps you want your running water level to be 1 - 2 inches over the top of the pump.
3. Make sure all your vertical return valves are wide open to start the system.
4. When the water is at the right level in both the tank & sump:
a. Take the U tube, slide the airline in so it just crowns the top of the U tube to the other side. Holding the airline in place in the U tube, set the U tube in place in the overflow box set. Have the longer side of the airline hanging out of the skimmer box. Do this to any other units then...
b. Start the water siphon in the U tube. Time Critical! You might want 2 people with one ready to turn off the pump while the other starts the U tube siphons. Remember! Once your pump is turned on water is pumping into your tank it has no way out except on the floor until you get the overflow(s) running & dumping water out to your sump. Turn on your water pump then take the outside portion of the airline & suck out the air in the U tube while pulling out the airline until water flows freely through the tube. This starts the water siphon. I'm Right handed so I use my left hand to hold the U tube in place while using my Right hand to hold & draw out the airline. This may take more than one try so be positioned/prepared to turn off the pump for a second try. Once flowing, if there are any air bubbles in the U tube gently tap them out by lifting & tapping the U tube up & down on the tank rim (do not bring the U tube all the way out of the water though or you'll loose your siphon & have to start it again!)
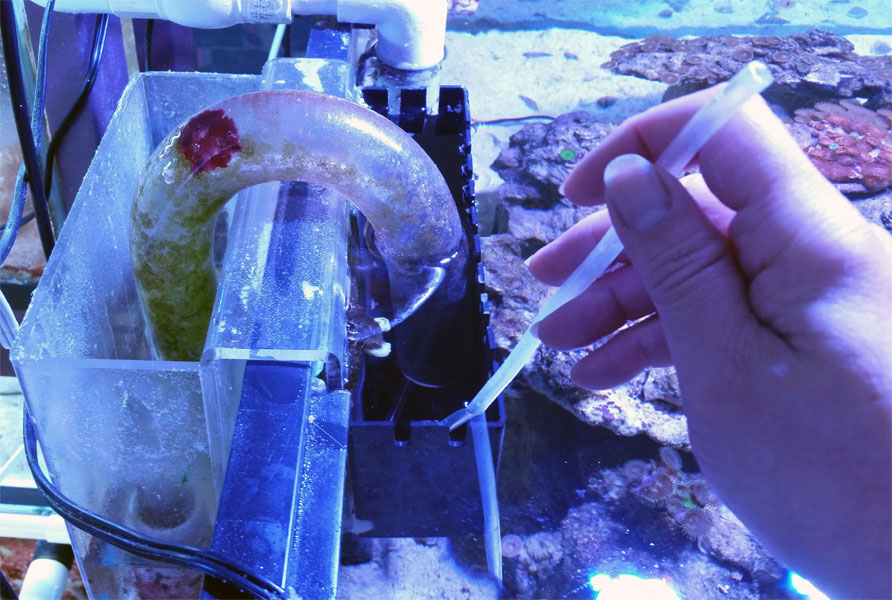
Once your box set(s) are running you will want to check the water level dropping inside the skimmer (toothed) boxes. The running water level inside the skimmer box(s) should be about 1 - 2 inches below the teeth. Any higher & they are running too hard & will be noisy. Any lower & they are running too slow & will allow air bubbles to catch up at the top of the U tubes, eventually making a bubble large enough to break the siphon. To adjust the water level in the skimmer box(s), open or close the ball valve on your pump.
Here's a mini video where I explain this:
To increase or decrease the water level inside the skimmer box we make slight hair turns on the main ball valve off the pump. After each adjustment WAIT a couple minutes as it takes the system time to catch up & adjust to the new flow rate. Adjust again if needed to achieve the 1/2 to 1 inch water level below the teeth inside the skimmer box.
WARNING! Once you start the system. if you turn off your pump the vertical returns will back feed tank water to your sump! The only way you can stop the water back is to shut off the main ball valve completely or your vertical returns will siphon your tank & overflow your sump! Get your overflows running then shut down the system, immediately turn off the main pump valve & drill those siphon holes in all of your returns so the next time you power off your system, the siphon holes sucking air will break the back feed & you won't have to touch your pump valve again.


